Kitchen Sink Plumbing Diagram: Every Part Explained
A kitchen sink plumbing diagram is basically a map of everything happening behind your cabinet doors, and once you can read one, a slow drain or a mystery leak stops being a mystery. I got curious about this the same way most home cooks do: something started dripping under my own sink, and I realized I had no idea what half the parts down there were even called. So I pulled apart the whole system, part by part, and mapped out how water actually travels from your faucet, through the basin, and out into your home’s drain line.
This guide walks through that full diagram in plain language, no plumbing license required.
What a Kitchen Sink Plumbing Diagram Actually Shows
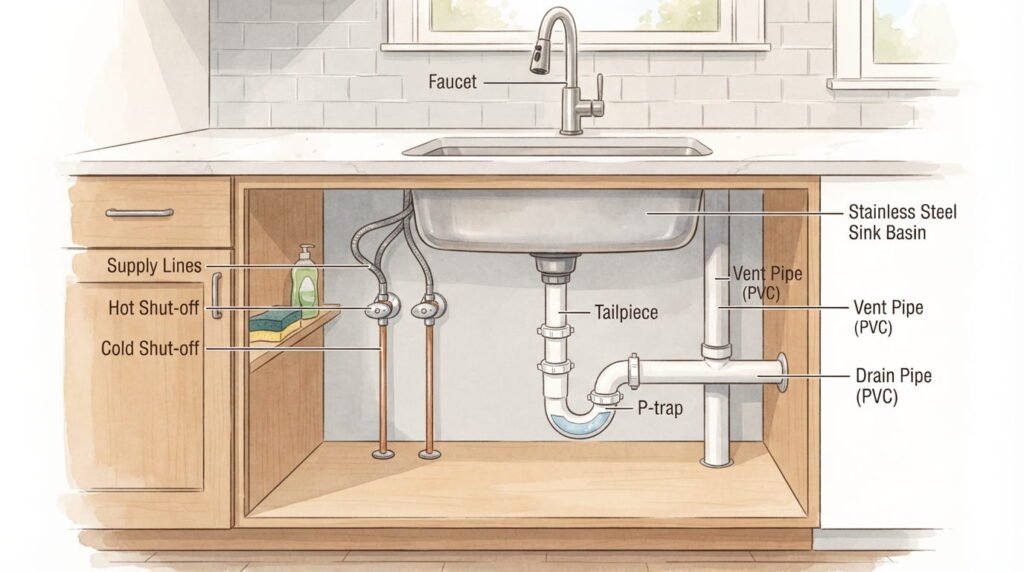
A kitchen sink plumbing diagram lays out the path water takes on its way in (through the supply lines and faucet) and on its way out (through the drain, trap, and vent). In one clean picture, it connects the faucet, basin, strainer, tailpiece, P-trap, trap arm, branch drain, vent, and shut-off valves, so you can see exactly how they fit together.
Think of it in two halves. The supply side brings hot and cold water in under pressure, through narrow lines that end at your faucet. The drain side is gravity-only: everything downstream of the basin relies on a slight downward slope, usually around a quarter inch per foot, to keep wastewater moving toward the main line instead of pooling under your cabinet.
The Faucet and Water Supply Lines: Where Water Comes In
The faucet is the part everyone recognizes, but it’s actually a small system of its own. Water arrives through two supply lines, one hot and one cold, that connect to shut-off valves mounted on the wall or floor behind the cabinet. Those valves matter more than people realize: they let you cut water to just the sink instead of the whole house whenever you’re doing a repair.
From the shut-offs, flexible supply lines run up to the faucet body, where the handle or handles control temperature and flow. Water then exits through the spout, passing through a small mesh aerator at the tip that breaks the stream into smaller jets. That aerator does double duty, cutting down on splashing and reducing how much water you actually use per minute. Many faucets also route a branch line out to a pull-down or side spray head, which shares the same hot and cold supply.
A decorative cover called an escutcheon often sits where the faucet or handles meet the countertop, hiding the mounting holes. It’s purely cosmetic, but it’s one of those labeled parts that shows up on almost every kitchen sink plumbing diagram because it marks where the supply side ends and the visible fixture begins.
Sink Basin, Strainer and Tailpiece: Where Drainage Starts
Once water hits the basin, it’s on the drain side of the system. At the bottom of the bowl sits the strainer, a perforated fitting that catches food scraps and debris before they can travel further down. A strainer is really three pieces working together: the strainer body you see from inside the sink, a flange that seals against the basin, and a locknut or coupling underneath that clamps it all in place.
Directly below the strainer is the tailpiece, a short vertical pipe that carries water down toward the trap. If you have a double-bowl sink without a disposal, both basins usually tie into a continuous waste fitting that merges the two drains before the trap, rather than running two separate traps.
This is also where slow leaks tend to start. A worn seal at the strainer flange, or a locknut that’s loosened over time, is one of the most common reasons people find a damp cabinet floor and go looking for a kitchen sink plumbing diagram in the first place.
The P-Trap and Trap Arm: Blocking Sewer Gas
The P-trap is the curved pipe under almost every sink, shaped like the letter P (or a J, depending on how it’s oriented). Its job isn’t just to route water, it’s to hold a small standing pool, usually one to two inches deep, that physically blocks sewer gas from drifting back up into your kitchen. That water seal is why a sink that hasn’t been used in weeks (a guest bathroom, a vacation house) sometimes develops a faint odor: the trap dries out and stops sealing.
From the P-trap, a horizontal section called the trap arm carries water sideways to the wall, where it connects to the branch drain. Codes typically limit how long that trap arm can run before it needs to tie into venting, because a trap arm that’s too long can let the trap siphon itself dry every time you drain a full sink.
P-traps are also where most DIY clog-clearing happens. Because the fittings are usually slip-joint connections rather than glued, you can loosen them by hand, dump out whatever’s trapped in the curve, and reassemble it without special tools.
Venting and the Branch Drain: Keeping Water Moving
Venting is the part of a kitchen sink plumbing diagram that trips people up, mostly because you can’t see it from under the sink. A vent pipe rises from the drain system, usually up through the roof, and its job is to let air into the pipes as water drains out. Without that air, the system creates a partial vacuum, which can pull water straight out of the P-trap, the same siphoning problem that lets sewer gas back in.
Where a full roof vent isn’t practical, like on an island sink far from any wall, plumbers often use an air admittance valve instead. It’s a one-way mechanical valve that lets air in without needing a pipe run all the way to the roof, though not every local code allows them, so it’s worth checking before you plan around one.
If you ever hear a gurgling sound while the sink drains, that’s usually air struggling to get past a blockage or an undersized vent, worth mentioning if you’re describing the problem to a plumber over the phone.
Garbage Disposal and Dishwasher Connections in the Diagram
Adding a garbage disposal changes this part of the diagram noticeably. Instead of a plain tailpiece, the disposal unit mounts directly under the strainer flange and takes over as the connection point to the P-trap. It needs its own electrical connection, either a dedicated outlet under the sink or a switched circuit, and most units include a knockout plug specifically for a dishwasher drain hose.
If your kitchen has a dishwasher, its drain hose typically connects to that disposal knockout, or to the tailpiece if there’s no disposal. Either way, the hose should loop up high before it drops down to the connection point, sometimes called a high loop, or run through an air gap fitting mounted on the countertop. Both methods exist for the same reason: to stop dirty water from siphoning back into the dishwasher if the kitchen drain backs up.
Double-bowl sinks with a disposal on one side sometimes use a baffle tee, which lets the empty bowl’s drain and the disposal both feed into a single trap without waste crossing over into the wrong basin while it’s draining.
Keeping the System Working
A kitchen sink plumbing diagram is really just a reminder that everything under the basin is connected: mess with the slope in one section, and the trap arm or vent downstream feels it too. A few habits go a long way toward keeping the whole system trouble-free. Skip pouring grease down the drain, since it hardens inside the trap and narrows the pipe over time. Run hot water through the disposal after use to help clear residue. And once or twice a year, take a look under the sink for water stains or corrosion around the slip joints, catching a small leak early is a lot cheaper than replacing a cabinet floor.
Material choice plays into longevity too. Brass and stainless strainers hold up better than plastic ones under daily use, PVC and ABS are the standard for drain lines in most homes, and braided stainless supply lines resist the kinks and cracks that plague older rubber hoses. None of it is expensive to upgrade a piece at a time as things wear out, and doing it gradually is a lot less disruptive than a full teardown later.
Most of what’s under your sink is simple once it’s labeled. The next time something drips, gurgles, or smells a little off, you’ll know exactly which part of the diagram to check first.
Common Kitchen Sink Plumbing Problems, Answered
Why does my kitchen sink smell bad even when it’s clean?
The most likely cause is a dry P-trap. If the sink isn’t used often, the water seal inside the trap can evaporate, letting sewer gas rise up through the drain. Running water for a minute usually refills the trap and clears the smell within a day.
Why does my sink make a gurgling noise when it drains?
Gurgling almost always points to a venting problem, either a partial clog in the vent pipe or a trap arm that’s too long for its vent distance. Air is getting trapped and forcing its way back through the water instead of moving freely through the vent.
Can I replace a P-trap myself?
Yes, in most cases. P-trap fittings are slip-joint connections you can loosen by hand or with pliers, no soldering or gluing involved. Keep a bucket underneath, since the trap holds standing water, and make sure the new trap arm keeps the same slope toward the wall.
Does a double kitchen sink need two P-traps?
Not usually. Most double-bowl sinks share a single P-trap through a continuous waste fitting that joins both basins before the drain. Two separate traps are only common when each bowl has its own disposal.