
Baked Japanese Sweet Potato: Easy Foolproof Method
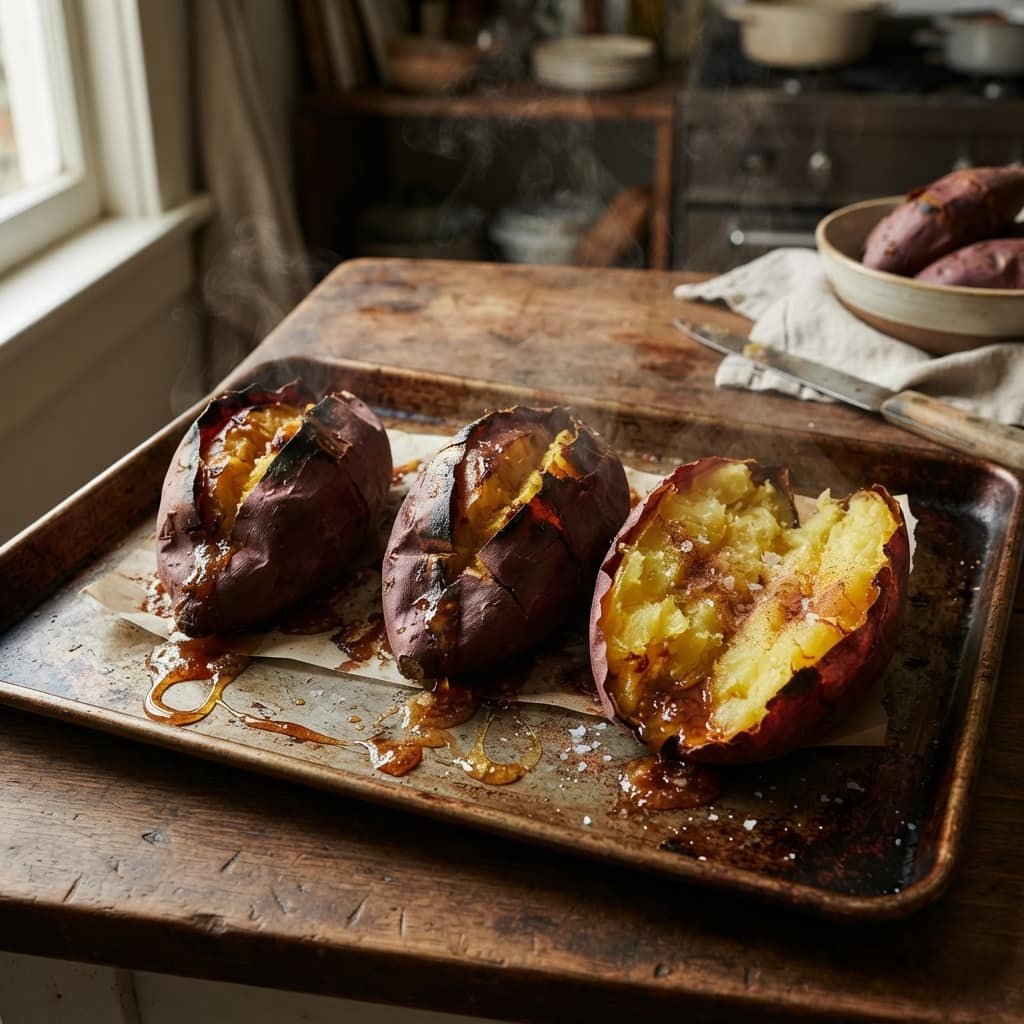
A baked Japanese sweet potato comes out of the oven with a caramelized, sticky-sweet skin and a fluffy, chestnut-flavored center, and it takes almost no effort to get there. If you’ve only ever baked the orange kind, this purple-skinned variety behaves differently in the oven, and a few small choices, like your oven temperature and whether you reach for foil, make the difference between a dry, chalky potato and one that tastes like dessert.
I started making these on repeat after picking up a bag of Murasaki sweet potatoes at my local Asian grocery store on a whim. The first batch, baked the same way I’d bake a regular sweet potato, came out fine but forgettable. The second batch, baked low and slow with no foil, came out with edges leaking golden syrup and a center so soft I ate it with a spoon. That’s the version I’m sharing here.
What Is a Japanese Sweet Potato?
Japanese sweet potatoes, called satsumaimo in Japan, have reddish-purple skin and pale, almost white flesh that turns a deep golden yellow once cooked. They’re not the same plant as the orange-fleshed sweet potato you’ll find labeled Garnet or Jewel at most American grocery stores, and once you taste one side by side, the difference is obvious. The flesh is drier and starchier, closer in texture to a russet potato, and the flavor leans nutty and chestnut-like rather than the marshmallow sweetness of a standard sweet potato.
You’ll sometimes see them sold as Murasaki sweet potatoes, Okinawan sweet potatoes, or satsumaimo. In the United States, look for them at Asian grocery stores, farmers markets, and increasingly at Whole Foods and Trader Joe’s. Pick potatoes that feel firm and heavy for their size, with smooth, unblemished skin. Any potato with soft spots or a shriveled end has been sitting too long.
Japanese Sweet Potato vs. Regular Sweet Potato
The most obvious difference is color. Japanese sweet potatoes have purple skin and pale flesh, while regular sweet potatoes have tan or copper skin with bright orange flesh. That color difference points to a real nutritional gap too: orange sweet potatoes are loaded with beta-carotene, which is what gives them their vitamin A content, while Japanese sweet potatoes have less of it but come out ahead on fiber and, by some measurements, vitamin C.
Texture is where the two really part ways. Japanese sweet potatoes have a lower moisture content than the orange kind, so baked flesh turns out drier, denser, and fluffier rather than moist and almost pumpkin-like. That lower moisture is also why Japanese sweet potatoes reward a slower bake. Rush the process and the starches never fully convert to sugar, leaving you with a firm, underwhelming center instead of the soft, jammy texture you’re after.
The Best Way to Bake Japanese Sweet Potato
There isn’t one single correct oven temperature for baking Japanese sweet potato, but there is a real trade-off between speed and flavor, and knowing that trade-off lets you pick the method that fits your evening.
High and fast (400 to 425°F): This is the weeknight method. Baking at 400 to 425°F for about 45 to 60 minutes gets you tender, sweet potatoes with skins that puff up and turn lightly crisp. It’s faster and works well when you want a side dish without babysitting the oven for 90 minutes.
Low and slow (325°F): This is the method serious Japanese sweet potato fans swear by, and it’s the one that produces that syrupy, candy-like caramelization. Baking at a lower 325°F for 75 to 90 minutes gives the potato’s natural amylase enzyme more time to break starches down into sugar before the outside overcooks. The payoff is a custardy, almost honey-injected texture, with syrup often oozing from the ends onto the pan.
If you’ve got the time, low and slow is worth it, especially for a lazy weekend when you plan to snack on the potatoes all week. If you need dinner on the table, the higher-heat method still gives you a genuinely good result.
Should You Wrap Japanese Sweet Potato in Foil?
This is one of the most-argued points among home cooks, and the honest answer is that it depends on what texture you want. Baking sweet potatoes unwrapped, directly on a lined sheet pan, lets moisture escape as steam, which gives you skins that turn lightly crisp and puffed, with more concentrated sweetness in the flesh. This is the method most recipe developers default to for a reason: it’s simpler and produces a drier, more caramelized exterior.
Wrapping the potatoes in foil traps steam inside, which softens the skin and keeps the flesh a little more moist throughout, similar to the effect of steaming. Some cooks who bake yaki imo the traditional way at home actually prefer this softer result, since it mimics the steamy texture you get from a stone-roasting oven.
Neither approach is wrong. If you want puffed, slightly crisp skin and maximum caramelization, skip the foil. If you’d rather have a softer skin and a more evenly moist center, wrap it. What you should never do is boil or microwave the potato as your only cooking method; baking is what develops that signature sweetness, since it’s a slow, dry heat that gives the starches time to convert.
How to Bake Japanese Sweet Potato: Step by Step
- Wash and dry the potatoes. Scrub off any dirt under cool water, then dry them completely with a kitchen towel. Damp skin is more likely to split in the oven.
- Poke a few holes. Using a fork or skewer, prick each potato two or three times on each side to let steam escape as it bakes. Don’t overdo the piercing, since too many holes can actually slow the bake down.
- Preheat the oven and line a sheet pan. Set the oven to 400°F for a faster bake or 325°F for the slow, caramelized version. Line a rimmed baking sheet with foil or parchment, since the sugars that leak out as the potatoes cook can burn onto a bare pan.
- Bake until tender. At 400°F, this takes about 45 to 60 minutes. At 325°F, plan on 75 to 90 minutes. Larger potatoes need more time than smaller ones, so if you’re baking a mixed batch, check the smaller ones first.
- Check for doneness. A skewer or thin knife should slide into the thickest part with no resistance. The skin will look slightly shrunken and may have dark, syrupy caramelization at the ends. That syrup is just the sugars cooking out, and it’s completely fine to eat.
- Let it rest. Give the potato 5 to 10 minutes before cutting in. This short rest lets the moisture redistribute so the center doesn’t turn gummy the moment you slice it open.
How Do You Know When a Japanese Sweet Potato Is Done?
The clock is a guideline, not a guarantee, since oven behavior and potato size both shift the timing. The most reliable test is to gently squeeze the potato with an oven mitt or towel; it should give easily, almost like a water balloon, with no firm resistance in the center. A skewer inserted into the thickest point should meet zero resistance. If you’re baking low and slow, you’ll also notice your kitchen start to smell like caramelizing sugar partway through, which is a good sign the potato is close to ready.
Can You Air Fry Japanese Sweet Potato?
Yes, an air fryer works well since it’s essentially a compact convection oven. Set it to around 370°F and cook whole, unpeeled potatoes for 35 to 45 minutes, flipping halfway through so they cook evenly. Smaller potatoes will finish closer to 35 minutes, larger ones may need the full 45. This method is a good middle ground when you want that oven-roasted texture but don’t want to run a full-size oven for an hour.
Ways to Serve Baked Japanese Sweet Potato
Once you’ve got a perfectly baked potato, the toppings are where you can have some fun. A few of my favorite ways to serve it:
- Split open and topped with a pat of butter, flaky salt, and a sprinkle of fresh chives or cilantro.
- Finished with miso butter for a salty-sweet, umami-rich twist that plays beautifully off the potato’s natural sweetness.
- Mashed with a spoon of Greek yogurt and a drizzle of maple syrup, then rewarmed for a few minutes for a twice-baked, higher-protein side.
- Sliced and added to a grain bowl or salad for natural sweetness without added sugar.
- Simply plain, still warm, sprinkled with a little sea salt, the way it’s traditionally sold as a street snack in Japan.
Storing and Reheating
Baked Japanese sweet potatoes keep well, which makes them an easy make-ahead side or snack for the week. Once fully cooled, store them in an airtight container in the refrigerator for up to 4 to 5 days. For longer storage, they freeze nicely for up to 2 months; just thaw at room temperature or in the fridge before reheating. To reheat, a few minutes in a 375°F oven or air fryer brings back that slightly crisp skin, or you can microwave a piece for about 30 seconds if you’re short on time.
What Temperature Should I Bake Japanese Sweet Potato At?
Bake Japanese sweet potato at 400°F for 45 to 60 minutes for a faster, still-caramelized result, or at 325°F for 75 to 90 minutes if you want the deeply sweet, syrupy texture that dedicated yaki imo fans prefer. Either temperature works, and the potato is done once a skewer slides through the center with no resistance.
Once you’ve got the method down, a baked Japanese sweet potato earns a permanent spot in the weekly rotation. It’s a whole vegetable that eats like dessert, needs one ingredient, and reheats better than almost anything else in your fridge. Try it this week, and if you land on a topping combination you love, I’d genuinely love to hear about it in the comments.


Pingback: How to Cook Japanese Sweet Potato (Easy 2026 Guide)