
Kitchen Wall Decals: How to Pick, Apply, and Remove Them
Kitchen wall decals are one of the fastest ways to change a kitchen without paint, tile, or a contractor. You peel, you stick, and you get a new look in an afternoon. The catch is in the details. The wrong decal on the wrong wall will bubble, peel at the edges, or lift paint when you remove it. This guide helps you pick the right type for your wall, apply it cleanly, and remove it later without damage.
Start with your wall, not the design. A smooth, clean, painted wall and a smooth tile backsplash are the easiest surfaces. Textured walls, fresh paint, and the hot area right behind a stove need more care, and sometimes a different product. If you get the surface right, the design part is easy.

Kitchen wall decals at a glance
| Type | Best for | Removable | Water and steam | Watch out for |
|---|---|---|---|---|
| Vinyl quote and letter decals | Blank walls, coffee corners, dining nooks | Usually yes, one-time use | Good in dry areas, weak in heavy steam | Textured walls, small letters that lift |
| Peel and stick tile decals | Backsplashes, old tile, stair risers | Usually yes, one-time use | Good for splashes, check heat rating | Grout lines, heat behind a stove, color batch differences |
| Botanical and herb decals | Farmhouse and cottage kitchens | Usually yes, some are repositionable | Good in dry areas | Large sheets that fold and stick to themselves |
| Peel and stick tile sheets and panels | Full backsplash coverage | Yes, with care | Often waterproof, check the listing | Uneven old tile, outlet cutouts |
| Chalkboard and memo decals | Shopping lists, family notes, kids menus | Usually yes | Wipe clean, avoid soaking | Chalk dust near food prep areas |
Price note: most kitchen wall decal sets cost far less than paint or tile, but prices vary by size, sheet count, and finish. Compare the total covered area, not just the pack price. A cheap pack that covers half your backsplash is not a bargain.
Types of kitchen wall decals, explained
Vinyl quote and letter decals
These are cut vinyl letters or shapes with no background film showing, so they look painted on from a distance. They work best on smooth, matte or eggshell paint. They are popular for coffee corners and dining walls because the design is light and you can read it from across the room. Small, thin letters are the hardest part. They lift first, especially if the wall has dust, grease, or a slight texture. If you love a quote design, pick larger letters and a simple font.
Peel and stick tile decals
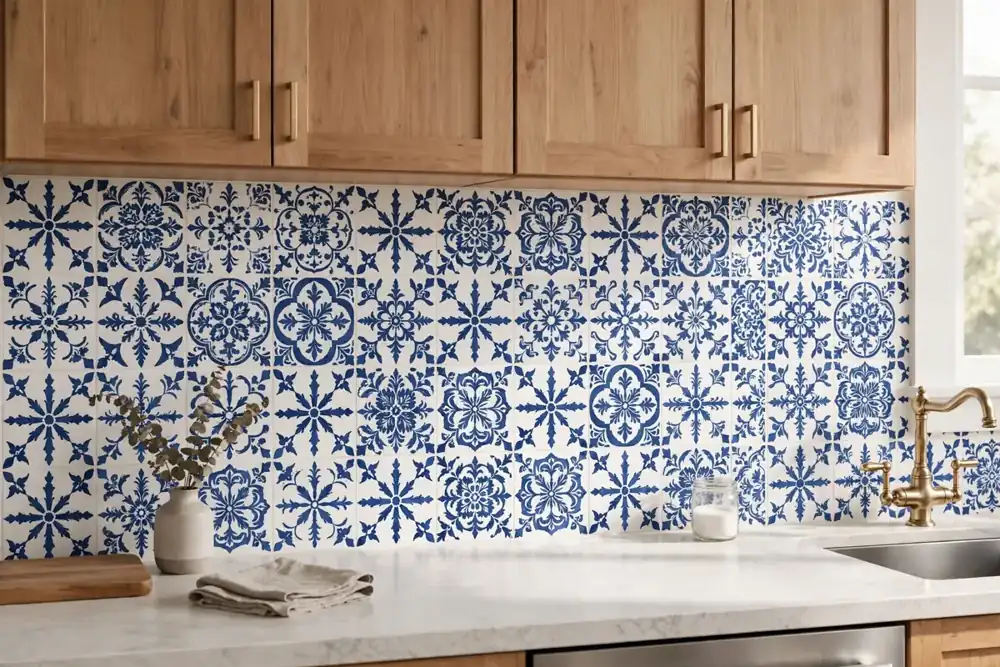
Tile decals are printed vinyl squares that mimic real tile, often in Mediterranean, Moroccan, subway, or marble patterns. You stick them directly onto existing tile or a smooth wall. They are the best choice when you hate your old tile but you do not want to remove it. They also work on cabinet fronts and stair risers. Measure your tile size first. Common sizes are 4 inch and 6 inch squares, and a decal that does not match your tile grid will look off.
Botanical, herb, and farmhouse decals
Herb sprigs, leaves, and farmhouse motifs suit kitchens with wood, open shelves, and warm light. These decals are often sold as sheets you can cut apart and arrange. That freedom helps in a small kitchen, because you can fill a narrow gap beside a window or above a shelf without buying a large mural. Keep the scale in mind. A tiny herb sprig gets lost on a large blank wall, and a huge leaf print can crowd a small galley kitchen.
Chalkboard and memo decals
Chalkboard decals give you a writable surface for a shopping list or a weekly menu. Put them where you stand with a pen in hand, such as beside the fridge or near the pantry door. Keep them away from direct food prep if chalk dust bothers you, and wipe them with a dry cloth first, then a lightly damp cloth if needed.
Pros and cons of kitchen wall decals
Pros
- Fast and low cost compared with paint or tile.
- Renter friendly when the product is marked removable and the wall is in good condition.
- Easy to change with the seasons or when you move.
- No grout, no dust, and no drying time.
- Good for covering dated tile without removing it.
Cons
- Most decals are one-time use. Once you peel them off, they usually do not stick well again.
- They struggle on heavily textured walls, rough plaster, and fresh paint.
- Heat, steam, and grease near a stove can loosen edges over time.
- Small letters and thin lines lift first and are hard to fix neatly.
- Color can vary slightly between batches, so a later top-up pack may not match.
How to measure and order
Measure the wall in inches, then multiply width by height to get square inches. Divide by 144 to get square feet. Do the same for a backsplash, but subtract large windows or range hoods if they break up the area. Then add 10 percent extra for cutting, mistakes, and a spare tile or two. For tile decals, count the tiles in each row and column instead of guessing. Buy all your packs at once, from the same listing, so the color batch matches. If you run out mid-wall, a new batch can look slightly different in daylight.
Order a sample first if the listing offers one, or buy the smallest pack to test on a hidden spot. A test tells you more than a product photo. It shows how the color looks in your light, how well it sticks to your wall, and how cleanly it peels off.
How to apply kitchen wall decals step by step
- Wait for paint to cure. If you just painted, wait at least 30 days before applying a decal. Fresh paint looks dry long before it is fully cured, and a decal can lift it when you remove it.
- Clean the wall. Wipe with a damp cloth and a mild cleaner, then let the wall dry fully. Grease near a stove is the most common reason a decal will not stick. Do not use a heavy oil-based cleaner right before you stick.
- Plan the layout on the floor. Lay tile decals out in order, or tape a quote decal to the wall with painter tape first. Step back and check the height. Eye level, or just above a counter, usually looks best.
- Start from one edge. Peel a small corner first, line it up, and press from the center outward. Use a credit card wrapped in a soft cloth, or a plastic squeegee, to push air bubbles to the edge.
- Work slowly on large sheets. Peel a little at a time. If a large sheet folds onto itself, it is hard to separate without stretching it. A second pair of hands helps here.
- Trim around outlets and edges. For outlet covers, turn the power off at the breaker if you need to remove a cover, trim carefully with a craft knife, and keep the blade away from wires. If you are unsure, leave the cover on and trim around it instead.
- Press the edges again after an hour. Edges near steam and heat lift first. A second firm press, after the adhesive has settled, helps them stay down.
Cleaning and durability
Most vinyl kitchen wall decals wipe clean with a damp cloth and mild soap. Do not scrub with an abrasive pad, and do not soak a paper-based decal. For a backsplash, wipe splashes soon after cooking, rather than letting grease sit for days. Steam from a kettle or a dishwasher can soften adhesive over time, so leave a small gap between a decal and a constant steam source if you can.
How long will they last? A good vinyl decal on a clean, smooth wall in a dry area can last for years. In a hot, steamy, or greasy spot, expect a shorter life, especially at the edges. That is normal for a removable product, and it is why the low price matters. You can replace a tired section without redoing the whole wall.
For a matching low-cost update, see this contact paper for countertops guide and this peel and stick floor tiles guide. Both use the same peel and stick idea, with different surfaces and wear.
How to remove kitchen wall decals without damaging paint
Removal is where most damage happens, and it is almost always because of speed, not the decal itself.
- Warm one corner with a hair dryer on low for 30 to 60 seconds. Heat softens the adhesive.
- Lift the corner gently and fold the decal back on itself as you peel. Do not pull straight out from the wall.
- Work slowly along the edge. If you feel resistance, stop, warm that spot again, and continue.
- Wipe any light residue with warm water and a soft cloth. Avoid metal scrapers and sharp knives on paint and drywall.
- Check the wall as you go, especially if the paint is old, flaking, or already damaged. A wall in poor condition can lift even with a good removable decal, so test a small, hidden area first.
Most removable decals are not reusable after removal. Some repositionable types can be saved on their original backing paper, kept flat, and kept away from dust and sunlight, but do not count on reuse for a standard vinyl decal. Plan your next design as a new pack, not a moved old one.
Renter tips
- Check your lease first. Most leases allow removable decor, but some limit adhesive products.
- Take a photo of the wall before you apply anything, and again after removal. That record helps if there is a deposit question later.
- Test in a hidden spot, such as behind the fridge or inside a pantry, before you cover a main wall.
- Avoid the hottest spot behind a stove and the wettest spot right beside a sink unless the product is rated for heat and water.
- Keep the original backing paper until you are sure you like the placement.
Style ideas that work in real kitchens

- Small kitchen: One horizontal row of tile decals, or one quote above the sink, adds interest without shrinking the room.
- Farmhouse kitchen: Herb sprigs, roosters, or a simple market quote pair well with wood and white tile.
- Modern kitchen: A single geometric tile pattern, in black and white or soft gray, looks cleaner than a busy floral print.
- Coffee corner: A small coffee decal, plus open shelves and mugs, makes a corner feel finished for very little money.
- Family kitchen: A chalkboard decal near the pantry keeps lists visible and keeps paper off the fridge.
For the rest of the room, this kitchen countertop decoration guide and this wall art for kitchen guide help you match decals with counters and framed art, so one wall does not fight the rest of the kitchen. If you want a bigger vinyl change, this guide to where to buy vinyl wrap for kitchen cabinets covers cabinet vinyl, which is a different product with stronger adhesion.
Mistakes to avoid
- Applying a decal to fresh paint, dusty paint, or a greasy backsplash.
- Skipping the layout step and sticking a quote crooked on the first try.
- Using a decal rated for dry walls in a high-heat spot behind a stove.
- Pulling a decal off fast and cold when you move out.
- Buying too little and mixing color batches on one wall.
- Covering a vent, a light switch, or an outlet in a way that blocks airflow or access.
Frequently asked questions
Are kitchen wall decals removable?
Most kitchen wall decals sold as removable are made to peel off, but most are one-time use. They are not the same as reusable static cling. Read the listing for removable, repositionable, or permanent, because those words mean different things.
Do kitchen wall decals damage paint?
When the paint is fully cured, in good condition, and the decal is removed slowly with gentle heat, most quality removable decals come off cleanly. Fresh paint, peeling paint, and fast, cold removal raise the risk of lifting paint. Test a hidden area first if you are unsure.
Can you reuse wall decals after removing them?
Usually no. Standard vinyl decals lose adhesion and shape when peeled off. A few repositionable products can be saved on backing paper, but do not plan a move around reusing a standard decal.
Do wall decals work on textured walls?
They work best on smooth walls. Light texture can work, but adhesion is weaker and removal needs more care. Heavy texture, rough plaster, and brick are poor surfaces for most flat vinyl decals.
Can you put tile decals on a kitchen backsplash?
Yes, on smooth tile or a smooth wall, and they are a popular renter fix for dated tile. Check the heat rating before you place them right behind a stove, and leave a gap or use a heat-resistant panel in the hottest zone if the listing warns against high heat.
How long do kitchen wall decals last?
It depends on the surface, heat, steam, and cleaning. In a dry area, a good vinyl decal can last for years. Near a stove or a steamy dishwasher, edges may lift sooner. Wipe splashes promptly and avoid abrasive cleaners to get the longest life.
How do you clean kitchen wall decals?
Wipe with a damp cloth and mild soap, then dry. Do not soak them, and do not use an abrasive scrub pad. For grease, a mild dish soap solution usually works, followed by a clean damp wipe.
Your next step
Measure your wall, pick one type that fits that surface, and test a small pack in a hidden spot first. If it sticks well and peels cleanly with gentle heat, order the full amount in one batch and lay it out on the floor before you stick anything to the wall. That one test saves you from the two most common problems: a design that looks wrong at full size, and a decal that will not come off cleanly later.
For removal detail, see this guide to removing wall decals without damaging paint. For product styles, the best kitchen wall decals guide and the kitchen wall decals list from Storables show how wide the style range is, from quotes to full tile patterns.

Sufyan Liaqat writes kitchen recipes, guides, and food content for Kitchennista. He focuses on practical advice that helps readers cook with confidence at home. His work covers everyday recipes and useful kitchen ideas.